Project 3: Documents and Photos
Goal 5: Add Photos

Goal 5: Add and manage photos in your MyHeritage tree.
Note : You can also upload videos, documents, and audio files, but videos and audio files cannnot be played on the site; they must first be downloaded from the site.
Choices
A Upload photos on your site.
- In the Family Tree menu, click My photos. The photos for your site are displayed on the screen.
- To upload an item to your tree,
a) Click Upload Photos;
b) Drag the photo, video, or document onto the upload screen (or click Select files, navigate to the item, and click Open); and
c) Click Done. Note : After you have created an album (see Goal 6), you can use "Select Album" to add the item you are uploading to that album. - Click View album to see the item in the Family photos page. From this page, you can use the Upload button to add more items.
- To use view options for a photo, click the photo.
- Click "View full size" to see the photo at its full size.
- To get a larger viewing area, but not full size, click the double arrows (above "In the Photo" on the right side).
- Click the left or right arrow (above the photo or next to the thumbnails in the upper right) to see the next or previous photo.
- To download an item to your computer, click the Download icon.
Resources
- Learn how to add a personal photo to someone in your tree.
 MH—Add a Photo to Someone in My Tree
 - This article explains the supported video and document formats.
 MH—Upload Videos or Documents to My Family Site
- * Good: Attach at least two photos for people in your tree and use the view options in this Choice.
- * Proficient: Same as Good, for four or more photos.
B Edit and delete photos on your site.
- In My Photos, click the photo or video you want to edit.
- To edit basic information about the item, click pencil icon next to the title. Fill in the fields (you can click the calendar to add a date), and click Apply.
- To add comments, type your comments in the field below the photo and click Add comment. The total number or comments for the photos is shown in the lower-right corner of the photo, when the album view is displayed.
- To rotate a photo, click the Rotate left or Rotate right icon.
- To delete a photo, click the trashcan icon and then click Yes in the confirmation dialog. This deletes the photo from the site and from all albums it appears in.
Resources
- This article explains how to replace the photo that appears in a person's card in the tree.
 MH—Changing the Photo in a Person's Card
 - Learn how to add a date to a photo on your site.
 MH—Add a Date to a Photo
C Tag photos on your site to identify people.
- In the My Photos page, click the photo you want to tag.
- Click Add a person (right side).
- Move the highlighted box over a person's face in the photo, and then size the box so it closely fits the face area.
- Type the name of the person in your tree that matches the person in the photo. When you find the name in the drop-down list, select it.
- Click Done. The name of the person is added to the "In the photo" list.
- To change the position or name for the tag,
a) Click inside the tag box;
b) Drag the box to the desired position or type a different name, or both, and click Done. - To remove a tag, click the X after the person's name and then click OK.
- To tag someone else in the photo, click Add another person.
Resources
- Learn more about tagging people in your photos.
 MH—Tag People in Photos
Note : If MyHeritage detects that there are untagged faces in a photo, it may highlight them in rectangles. In that case, you can click the rectangle to name the person, or click the "Click to name" link under In the photo.
Exercises- * Good: Tag one or more people in at least two uploaded photos, changing the position for one of the tags.
- * Proficient: Same as Good, for at least five uploaded photos.
D Add or see details about people tagged in photos.
- To add keywords, which are used in searches for a photo or video,
a) Click Add (next to Keywords);
b) Type the keywords, separated by commas; and
c) Click Apply. - To add notes to a photo,
a) Click Add (next to Notes);
b) Type the notes; and
c) Click Apply. - To show the link (URL) for the current photo, click Show (next to Link to this photo). You can then copy and paste this link to share it with others. Click Hide to hide the link.
- Photo details are shown in the Info area, in the My Photos screen.
- To see a list of people who are tagged in your photos,
a) Click People (left side). You can then select an individual to see all photos or items that person is tagged in. To display items that have no tags, click "not Tagged" (bottom of the list). - To search for media items that have a particular tag,
a) Type the tag name into the Search field (upper right); and
b) Click the magnifying glass to do the search. The search results screen has the following features:- Search fields (top)—To do another search, fill in the name field and click the blue arrow. (You can also choose to search for Albums instead of Photos.) To perform an advanced search, click "Show advanced search". You can use "AND" or "OR" keywords in the search field to control results. You can also select an item in the "Search in" drop-down to search only a certain type of source information.
- All Photos—Shows all photos in the tree, not the search results
- Thumbnail / List view—To switch to a thumbnail view for the search results, click the green thumbnail icon.
- Sort by—Click the "Place", "Date", "Submitter", or "Last update" link to set the sort order for search results.
- Per page—Click the "Per page" drop-down to select the number of results to display per page.
- Information table—Shows details for each photo. Click a title or thumbnail to enlarge the photo. In Actions (right side) you can click View, Delete, or Album.
- * Good: Add keywords and notes for at least two photos, and share one or more photos with someone else.
- * Proficient: Same as Good, for at least five photos and two shares.
E Use the Instant Discoveries feature for photos.
- Learn more about photo discoveries in this article.
 MH—What Are Photo Discoveries?
 - Learn how to add a photo discovery to your tree.
 MH—Add a Photo Discovery to My Tree
 - This article explains how to reject a photo discovery.
 MH—Reject a Photo Discovery

F Use the Colorize Photos feature.
- In the Family tree menu click Colorize photos.
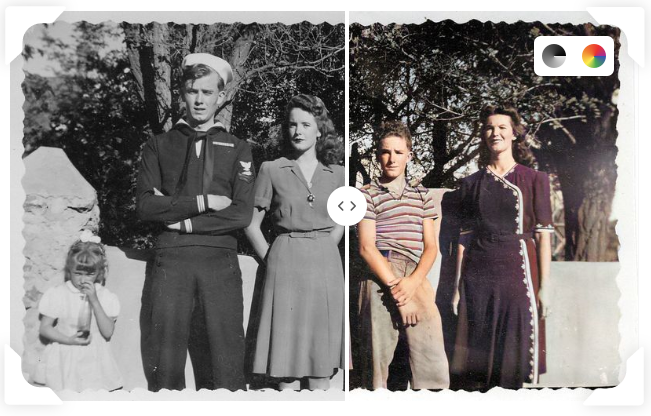
- Drag a photo into the colorizing frame on the right (or click Upload photo and navigate to your photo) and wait for the colorizing process to finish. The photo is displayed in half black-and-white, half color.
- To display all of the photo in color, click the color icon (upper right). To display all of the photo in black and white, click the black-and-white icon (upper right).
- To display part of the photo in color, move the arrow slider in the photo left or right.
- To share the photo with others, click Share on Facebook or Share on Twitter and follow the steps. You can also click Copy link to clipboard so you can share via email or other social media.
- To download the colorized photos to the Downloads area on your device, click Download photo (lower left) and then select Colorized photo or Comparison. The Comparison version includes the original photo at the top and the colorized version at the bottom.
- If you upload a color photo, the feature will restore original colors as much as possible. Follow the steps above for uploading a photo to be colorized.

Resources
- Learn more about enhancing photos in this article from MyHeritage.
 MH—Colorize Your Black-and-White Photos Automatically - 2020
 - Learn more about the Color Restoration feature on MyHeritage.
 MH—Introducing Color Restoration on MyHeritage - 2021
G Use the Photo Enhancer feature.
- In the Family tree menu click Enhance photos.
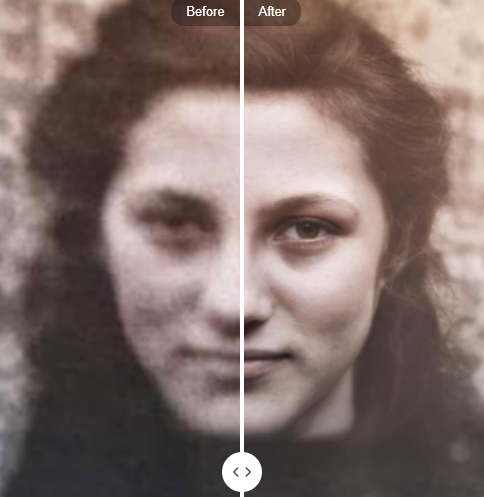
- Drag a photo into the enhancement frame on the right (or click Upload photo and navigate to your photo) and wait for the enhancement process to finish. The enhanced photo is displayed in the screen.
- To see different amounts of the enhacement, move the Before-After slider bar in the photo left or right.
- To see how the enhancement affects people's images in the photo, click any of the person thumbnails at the bottom.
- You can also click the Colorize photo button (top) to colorize the enhanced photo.
- To share the photo with others, click Share on Facebook or Share on Twitter and follow the steps. You can also click Copy link to clipboard so you can share via email or other social media.
- To download the enhanced photo to the Downloads area on your device, click Download photo (lower left) and then select Enhanced photo or Comparison. The Comparison version includes the original photo at the top and the enhanced version at the bottom.

Resources
- Learn more about enhancing photos in this article from MyHeritage.
 MH—Introducing the MyHeritage Photo Enhancer - 2020
H Use the Deep Nostalgia feature to animate photos.
- Go to the Deep Nostalgia page on MyHeritage.
- Click Upload Photo and navigate to the photo on your device that you want to animate; then click Open. (Your photo must be at least 300x300 pixels in size.) If necessary, the photo will be enhanced on the MyHeritage site before being animated.
- To download the animation video, click Download video.
- To share the video on social media, click the Facebook or Twitter icon and follow the prompts. To copy the MyHeritage video link, click the Link icon.
Resources
- Learn more about Deep Notalgia in this article from MyHeritage.
 MH—Deep Nostalgia™ is an Internet Sensation! - 2021

