1: Navigate Your Tree
2: View Information
3: Edit Information
4: Add People to Tree
Show Me, Goal 3
 Translation Tips
Music

![]()
Project 2: MyHeritage Tree
Goal 3: Edit Person Information

Goal 3: Edit person information in your MyHeritage tree.
Editing facts and profile information is essential to keeping your tree up to date. You can do a Quick Edit or a Profile Edit, or you can edit facts in a Person window.
Choices
A Do a Quick Edit of a person's information.
- In the Person window, click the Edit (pencil) icon; or click the pencil icon in the lower-right corner of the person's card in the tree view.
- Change or add information for any of the fields in the window. These include birth, marriage, death, and spouse information. If you imported information via a GEDCOM, the location fields will have drop-down lists from that GEDCOM to choose from.
- Click OK to save your changes.
- You can also edit an entire Profile by clicking the "Edit more" link at the bottom of the window. See Choice B below for details.
Resources
- This article explains how to edit a person's details in your tree.
 MH—Edit Someone's Details in My Online Tree
 - Learn about editing your tree in Pedigree view.
 MH—Editing a Tree in Pedigree View - 2019
- * Good: Do a Quick Edit for an ancestor in your tree.
- * Proficient: Do a Quick Edit for at least three people in your tree.
B Edit an ancestor's profile.
Summary
- Add or change information in basic fields.
- Edit ancestor information in the Essentials screen.
- Open a Person window and click Profile.
Note : For information on adding photos, biography, or web content, see Project 3: Documents and Photos. - Scroll down to "Education" and add or change information in any of the fields at or below that point.
- In the upper-left part of the screen, click Edit profile. This opens the "Essentials" screen, where you can update basic information about the person.
- Click any of the links at the left of the screen to edit other types of information. These links include:
- Family
- Biography
- Contact info
- Work
- Education
- Favorites
- Personal info
- Source citations
- All facts
- To save changes on any of these edit screens, including the main Essentials screen, click Save and Continue.
- To save changes and return to the person's Profile page, click Save and Close.
- * Proficient: Update the Profiles for at least three people in your tree.
C Edit or delete Facts in the Person window.
- In an open Person window, scroll down to the Facts section.
- To edit an existing fact, click the Pencil icon that appears when you hover over one of the Facts. In the edit window that appears, update the information and click OK to save the changes.
- To delete a Fact, click its Pencil icon and then click the trash icon. Click OK to confirm the deletion.
- * Proficient: Edit Facts for at an ancestor in your tree.
- * Proficient: Edit Facts for at least three people in your tree.
D Add Facts in the Person window.
- In an open Person window, scroll down to the Facts section.
- Click Add Fact (top of the Fact section).
- Select a fact category (left column).
- Select a fact type (right column).
Note : Instead of the preceding two steps, you can select a Fact type from the list at the bottom of the window. - Click OK.
- In the data entry window that appears, fill in the fields and click OK. For places, use the drop-down list whenever possible.
- To delete a Fact, click its Pencil icon and then click the trash icon.
Exercises
- * Proficient: Add Facts for at least three people in your tree.
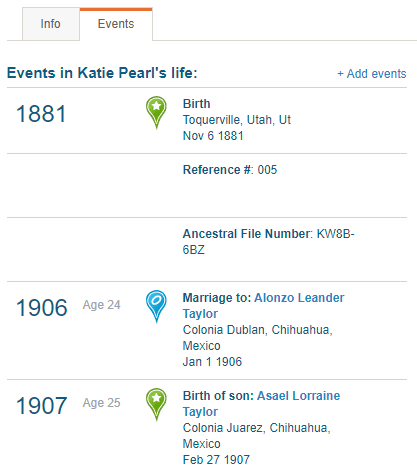
E Add, edit, or delete events in the Events tab.
- Open an ancestor's Profile and click the Events tab.
- To add an event,
a) Click Add Eventand follow the instructions for adding a fact (see Choice D above). - To edit an event,
a) Hover over the event in the timeline list;
b) Click the pencil icon;
c) Fill in the fields on the screen; and
d) Click Save and close. - To delete an event,
a) Hover over the event in the timeline list;
b) Click the trashcan icon; and
c) Click Yes. - On the right side, you can also see a Google map for the birthplace of the ancestor.
