1: Navigate Your Tree
2: View Information
3: Edit Information
4: Add People to Tree
Show Me, Goal 2
 Translation Tips
Music

![]()
Project 2: MyHeritage Tree
Goal 2: View Tree Information

Goal 2: View information about people in your tree.
You can view facts and profile information for people in your MyHeritage tree, using a number of different screens.
Choices
A View the Facts for a person.
- Click a person card to center it, and click it again to open the Person window. You can also open a Person window by clicking the small person icon (upper-left).
- In the Person window, scroll down to Facts. These may include birth, marriage, death, and births and marriages of children.
Note : If you imported information from a GEDCOM file, the Notes and other fields may appear as Facts, such as Biography, Ancestral File #, etc.
Exercises
- * Proficient: Read the Facts for at least three people in your tree.
B View profile information for a person.
- Click Profile in a Person window. (If there is no Person window open, click the person's card in the tree to open it.)
- Above the person's name, your relationship to the person is outlined. You can click a name in the relationship chain to see the profile for that person.
- Scroll down the Info page to see record matches, photos, immediate family (parents, siblings, and children), and more. To learn more about the Info tab, see Choice C below.
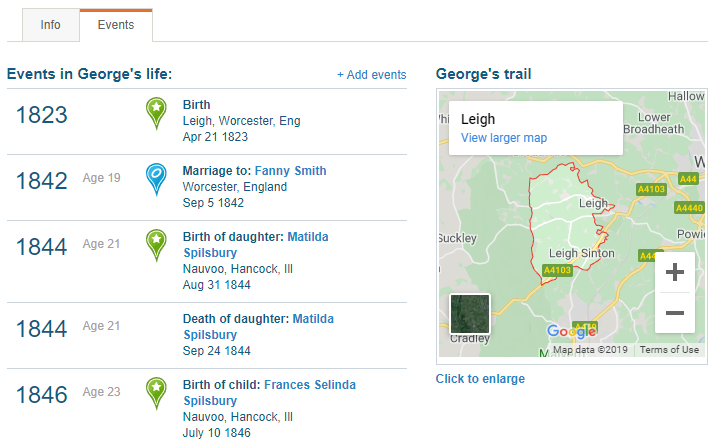
- Click the Events tab to see a list of chronological events in the person's life, as well as a "Trail" (Google map) section that shows where some of the events took place. To learn more, see Choice D below.
- To add a photo to a person's card or profile,
a) Click the camera icon in the person card,
b) Drag a photo into the window, or click Select File and navigate to the file you want to use; and
c) Click OK. - To adjust the photo you added to a person's card,
a) Drag the slider bar to set the zoom;
b) Drag the photo itself to move its position; and
c) Click OK. You can also click Clear profile photo and then click OK.
Resources
- To learn more about profile photos, watch this video.
 MH—How to Add and Change a Profile Photo—1:28 - 2019
- * Good: View details in the Profile, Info, and Events tabs for a person in your tree.
- * Proficient: Same as Good, for at least four people in your tree.
C See more information for a person in the Info tab.
Summary
- See birth and death locations on a Google map.
- Get an introduction to PedigreeView.
- See summary information for records.
- In a Profile page for a person, click the Info tab. Birth and death information, if available, is displayed at the top of the screen.
- To see the location in PedigreeView, click View in Pedigree Map (left side), or click a location link below the person's name. For more details about PedigreeMap, see Goal 6 in this Project.
- In the Records section, hover over a record to see a summary of its information. A confidence rating shows how likely the record would match your person, according to MyHeritage.
- If you want to handle the record match, click Confirm to accept the record source, or Reject to clear it. You can do record matches for any of the matches that appear in the Records section. For help with extracting record match information, type and select "Can I extract information from matches?" in the MyHeritage Help Center.
- To learn more about Record Matches, see Goal 10 in this Project.
- The "Immediate family" section of the Info page shows spouse, children, parents, and siblings. To see the profile for one of these people, click the person's name.
- To add a memory for the person, type it in the "Share your memories" window (bottom of the screen) and click Add comment.
- * Good: For a person in your tree,
a) see birth or death information in Google Maps;
b) see the PedigreeView location for a person's information; and
c) view a record summary. - * Proficient: Same as Good, for three people in your tree.
D See events (Events tab) for a person.
- In the Profile page, click the Events tab to show events in the person's life. These events come from the "All facts" page. A green star icon indicates a birth; a blue ring icon indicates a marriage; and a gray headstone indicates a death.
- You can use the "Trail" (Google map) area to see where some of the events took place. You can drag to move the view, or click the plus or minus buttons to zoom in or out, or enlarge the map.
- You can also add, change, or remove events in the screen. For details, see Choice E in Goal 3.

- * Good: Review the events in two ancestors' lives.
- * Proficient: Same as Good, for four ancestors.