Project 2: Memories
Goal 4: Browse Memories

Goal 4: Browse FamilySearch Memories to see photos and documents for your ancestors.
Seeing what has already been added to FamilySearch Memories will help avoid duplication and may give you ideas for the kinds of images you'll want to add. For an overview, watch this video.![]() FS—Preserving Memories - 2014
FS—Preserving Memories - 2014
Choices
A View Memories for an ancestor.
Summary
- Find ancestors with Memories.
- See the details of selected Memories.
- Use other views to discover Memories.
- Find an ancestor's Summary panel that has a positive value in the Memories link, and click Memories. You will see any photos, documents, stories, or audio files that have been posted for the ancestor.
Viewing Photos
Note: To learn about viewing documents in Memories, see Goal 7; for stories, see Goal 8; and for listening to audio, see Goal 10. For tagging and management options for photos, see Goal 6.
- To see the full-size version of a photo, click on it. You can then click "Open in a New Tab" (upper right) if desired.
- To zoom the photo, click the plus or minus icons (upper left), or click the broken-box icon to enter full-screen mode. To exit full-screen mode, click the X. You can also drag the image on the screen, or click the target icon to re-center it.
- If you added the photo, you can click Actions (upper left) to do any of the following: rotate the photo left or right; adjust brightness and contrast; invert the color; download the photo; add to an album; change the file category from photo to document; move to your archive; or delete the photo. If someone else added the photo, Actions is limited to downloading a photo or adding it to an album.
- To bookmark the photo, click the Bookmark icon (upper right). The bookmark is noted below the photo and in the Memories Gallery (see Goal 11).
- To archive a photo you added, click Actions (three dots, upper right) and select Move to My Archive. To restore the photo to Memories, click Actions and select Move to Memories.
- To delete a photo you added, click Actions and select Delete. Then click Delete from FamilySearch or Move to My Archive. Note : When you delete photo or other memory, it can be restored for up to 120 days. See Goal 11, Choice B.
- To view other photos for the person, without having to return to the person's Memories page, at the top of the screen click the Previous or Next buttons .
- While viewing a photo or other Memory, you can use path at the top of the page to return to the main Memories page or the Person page.
- If you added the photo, you can click Public and select Private so only you can see the photo.
Resources
- Learn about features of the image viewer.
 FS—What are the features of the image viewer in memories? - 2024
Exercises
- * Good: Study the photos and documents for 3 of your ancestors and take notes on what you learned.
- * Proficient: Study the photos and documents for 8 of your ancestors and take notes on what you learned.
B Select, change, or remove a main portrait photo for an ancestor.
Summary
- Select a portrait ancestor photo.
- Edit or change a portrait ancestor photo.
- Remove a portrait ancestor photo.
The main portrait photo for an ancestor is visible in the Summary panel and in Family Tree. Note : Before setting a portrait photo, be sure that Portraits have been enabled in the Options menu (see Project 1, Goal 1, Choice D). Also, changes you make to the portrait photo are visible to everyone viewing this person.
- Open the Person page for the ancestor.
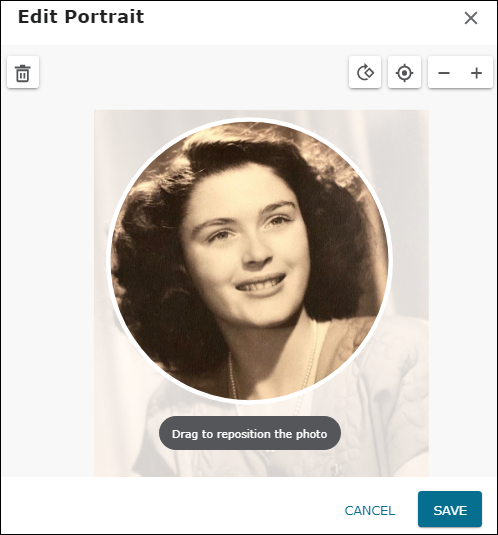
- In the upper left, click the generic person icon and select Add Portrait. You can then select Upload Photo or Select from Gallery, or choose a photo shown in the list, if any.
- For Upload Photo, navigate to the photo on your device and click Open.
- For Select from Gallery, select the photo from the list (if available) and click Attach.
- Drag the photo until the face fits neatly in the circular frame.
- On the left, move the slider bar to shrink or enlarge the photo if necessary. You can also click the Rotate Left icon (upper left) if needed.
- Click Save as Portrait.
- To edit an existing ancestor portrait photo,
a) Click the portrait (upper-left corner of the Person page) and select Edit Portrait;
b) Move the photo, drag the slider bar, or rotate the photo as needed; and
c) Click Save as Portrait. - To edit an existing ancestor portrait photo, click the portrait and select Edit Portrait. Then follow the basic guidelines above to select, position, and save the portrait.
- To replace an existing ancestor portrait,
a) Click the portrait and select Replace Portrait;
b) Select the photo you want on the page, or click Upload Photo or Select Photo to find the one you want; and
c) Adjust the photo as explained above and save the portrait. - To remove an existing ancestor portrait photo, select No portrait.
- For more information on working with ancestor portrait photos, read the articles.
 FS—Changing the Preferred Photo - 2018
 FS—How do I add or change a portrait photo in Family Tree? - 2024
 - * Proficient: Add two or more ancestor portrait photos.

Resources
C Use the People view in Memories to see collections of photos.
Summary
- See ancestor photos in People.
- Limit, sort, and search the photos.
- Use the View My Relationship feature.
- At the top of the main FamilySearch window, in the Memories menu, choose People. An identifying photo is shown for each of your ancestors who has a photo in Memories.
- If you want to limit the number of ancestors on the page, click the Show menu (upper right) and select a different category (Close Relatives, Added by Me, or Not Attached to Family Tree). To see descriptions for each category, hover over the Info button to the right.
- To sort the Memories, choose a category from the Sort by menu.
- To search for certain Memories, click the magnifying glass. In the Filter field, type the name you want to search for. To return to the full view, at the right of the Filter field click the X.
- To see how you are related to a particular ancestor, at the bottom of a Person tile click View My Relationship. A vertical pedigree appears, showing the ancestral connection between you and the person.
- To show the available photos in the person's Memories page, click the ancestor's photo.
- To add a person to your Following list, click the star next to the person's photo. To stop Following the person, click the star again.
- * Good: View the ancestor photos on your People page and sort them two different ways.
- * Proficient: Same as above; also, view your relationship to at least 3 different ancestors on the People page.
D Use the Find feature in Memories to locate items.
Summary
- Search for a keyword or person with the Find option to see what Memories appear.
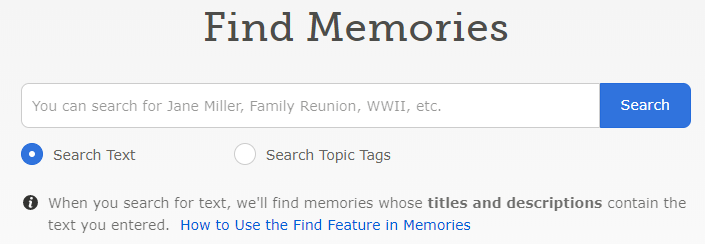
- In the Memories menu (top of the main FamilySearch window), choose Find.
- Select Search Text (default) or Search Topic Tags. For more information on Topic Tags, see Goal 6, Choice D.
- Type the name of the item you want to search for, and then click Search. Your search term will return a list of all FamilySearch Memories items (not just the ones you've added) that have the item in the title or in the contents. To limit the search to exactly the search item you type, enclose it in quotes ("Jones", or "Vienna", or "1850" etc.)
- Click an item from the returned list to see its contents.

Resources
- For more information on the Find feature, click "How to Use the Find Feature in Memories" (upper-right corner of the search results).
- To learn about advanced search options, read this article .
 FS—Advanced search options for Memories - 2024
- * Good: Choose a search term of interest to you and search all Photos in Memories with that term. Select a few of the returned items and examine them.
- * Proficient: Same as above, but select All for the search criteria.

