1: Ancestry Account and Tree
2: Customize Profile and Site Settings
3: Browse Homepage
4: Trees and Settings
![]() Translation Tips
Music
Translation Tips
Music

![]()
Project 1: Get Started
Goal 2: Customize Profile and Site Settings

Goal 2: Customize your profile and site settings.
This Goal helps you control a number of useful settings for your Ancestry account.
Choices
A Change your profile settings as needed.
Summary
- In your profile, change your name, display name, location, or photo.
- Update your personal information.
- Help other Ancestry members.
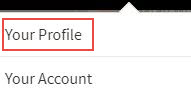
- In the Home screen, click your initials (upper right) and select Your Profile. Your personal profile page is displayed; only you can see this.
- To update your public profile content (everyone on Ancestry can see this),
a) Click Edit (left side);
b) Choose your display name (real name or username);
c) Type your age group, location, and languages spoken and select them from the drop-down list;
d) Type a brief note about yourself; and
e) Click Done. - To add or change the photo used in your profile page,
a) Click the camera icon (upper left);
b) Click Add or Change photo (lower right);
c) Navigate to the photo you want to upload and double-click it;
d) If adding a photo, you can drag the slider bar to zoom in or out; and
e) Click Save. To remove a profile photo, click the trashcan icon and then click Remove photo. - If your profile is not complete,
a) Click the info icon (next to Profile Completion and the additional link in the popup;
b) Click Continue;
c) Fill in the information requested; and
d) Click Save. - To add contact information,
a) Click Edit (below your name) and select the Contact tab;
b) Fill in any of the fields on the page so others can contact you via social media or your website(s); and
c) Click Done. The contact items you add become clickable links in your Profile page. - To update your family history background,
a) Click Edit (below your name) and select the Family History tab;
b) Fill in values for the categories; and
c) Click Done. - To add one or more research interests,
a) Click "Add a research interest now";
b) Click "Add a new interest";
c) Fill in the info for last name, location, date range, and comments; and
d) Click Save. This info will appear on your profile for other Ancestry members to see (unless you clear the "Share this information" checkbox). Then click "Return to profile (upper left). - To share more about yourself with other Ancestry users,
a) Click "Share more about yourself";
b) Click "Okay, got it"; and
c) Answer each question that appears, clicking Submit for each one. - If you would like to help other Ancestry members with their research, find the "Helping Others" box (left side), check any boxes of interest.
- To edit your public profile settings,
a) Click Settings (below your name); and
b) For Profile details, DNA Summary (if applicable), and Family History, click a right arrow (right side) to set the visibility for the option, and then click Save for each.
Profile Photo
Profile Completion
Contact Info
Family History Background
Research Interests
Help Others
Public Profile Settings
B Change your account settings as needed.
- Click your initials (upper right) and select Account Settings.
- In the Account Information box, select one of the following items and click its right-arrow to change it:
- Name
- Username
- Email address
- Password
- Two-step verification
- Connected accounts
- If you have signed up for one or more memberships with third parties and Ancestry, you can cancel or reinstate them in the Membership box.
- To edit tree settings, click Trees (left panel) and select a tree (from the "Your trees" box). The following actions are available in Your Trees:
- Tree Name—Name the tree.
- Tree Description—Provide a description for the tree.
- Automatically build stories for this tree
- Your home person—Set the home person (first position) for the tree, or set it to none.
- Who you are in this tree—Identify your name in the tree, or set to none.
C Change your notification settings as needed.
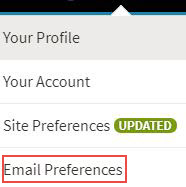
- In the Home screen, click your name (upper right) and select Notification Settings.
- On the page, select any items of interest that you want to be notified about. Changes to your settings are recorded automatically.
D Read and send email in Ancestry.
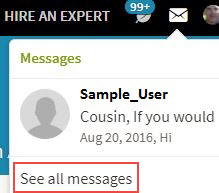
- In the Home screen, click the envelope icon (upper right). A list of messages appears.
- To see a list of all your email messages, click "See all messages"; or click a message to open it.
- To reply to an open message, type a reply and click Send.
- To compose a new message,
a) Click New (next to messages);
b) Fill in the To, Subject, and Message fields; and
c) Click Send. - To delete a message, click the trash icon at the right.
- To search for a keyword in either Contacts or Messages, type the keyword in the Search field and click the search icon.
- To scroll to additional messages, click the arrow buttons below the list of messages. You can also select the number of messages to display per page (10, 25, or 50).
- To see profile information for the person who sent a message, open the message and click the name at the top of the message area. Profile information is displayed in the right panel.